Modifying your car can be a daunting task, what with so many products available on the market, and conflicting views about which ones are effective. To help you out with some solid advice, we roped in Andre Simon from High Performance Academy to tell you exactly what works and what doesn’t. This time he advises us on how to build any Toyota 1UZ-FE into the perfect all-rounder, and shows us the steps you’ll need to follow if you want to get the best bang from your performance dollar …
NZ Performance Car: Tell us about the different models of Toyota V8
Andre: Toyota’s 1UZ-FE V8 is one of the most popular and abundant V8 engines to come out of Japan. Since these units are more popular for engine swaps than they are in their native chassis, we will break with tradition this month, and focus on the engine rather than a particular model of car.
There are two variations of the Toyota V8 powerplant which are common for engine swaps — the early 1UZ-FE four-litre unit, which can be recognized by its twin-distributor ignition system, and the later 1UZ-FE VVTi 4.0-litre engine, which includes variable cam control, direct-spark ignition, and a drive-by-wire throttle. There is also a 4.3-litre variant called a ‘3U-ZFE’, but as these engines demand a little more money, they are not as common for swaps.
All the Toyota V8 motors offer amazing value for money, in a relatively bulletproof package. The later VVTi model offers slightly more power, better fuel economy, and a decent increase in mid-range torque. If you can afford the 3UZFE engine, it is the most powerful in stock form.
Is there anything we should watch out for when picking an engine?
Since the 1UZ-FE unit is inherently very strong, there isn’t too much you need to worry about. With Toyota’s famous reliability, we have seen examples with over 250K kilometres on the clock that still drive perfectly, make great power, and use no oil. Of course lemons do exist, so talk to your engine supplier about a start-up warranty for peace of mind.
If you are worried about the condition of an engine, a good tip is to remove the rocker covers and check the internal condition. A well-maintained motor that has had regular oil changes should have a nice golden colour to the inside of the rocker cover. If on the other hand the rocker cover is covered in dark black sludge, move along to the next engine!
Is there anything we should do before modifying an engine?
As these powerplants are normally imported with very limited information about their service history, it is sensible to do a thorough service on the engine prior to installation. This includes the usual suspects such as the cambelt, water pump, and cambelt idlers and tensioner. A new set of spark plugs is also a worthwhile investment. The early 1UZ-FE engines are prone to having trouble with their stock ignition leads, so it can be worth replacing these too.
With any imported motor, I tend to fill it with fresh oil and a new filter prior to the initial start-up. I then run the engine for 30 minutes or so to get everything nice and hot before doing another oil and filter change. This helps flush it, and ensures you are ready to go with good oil.
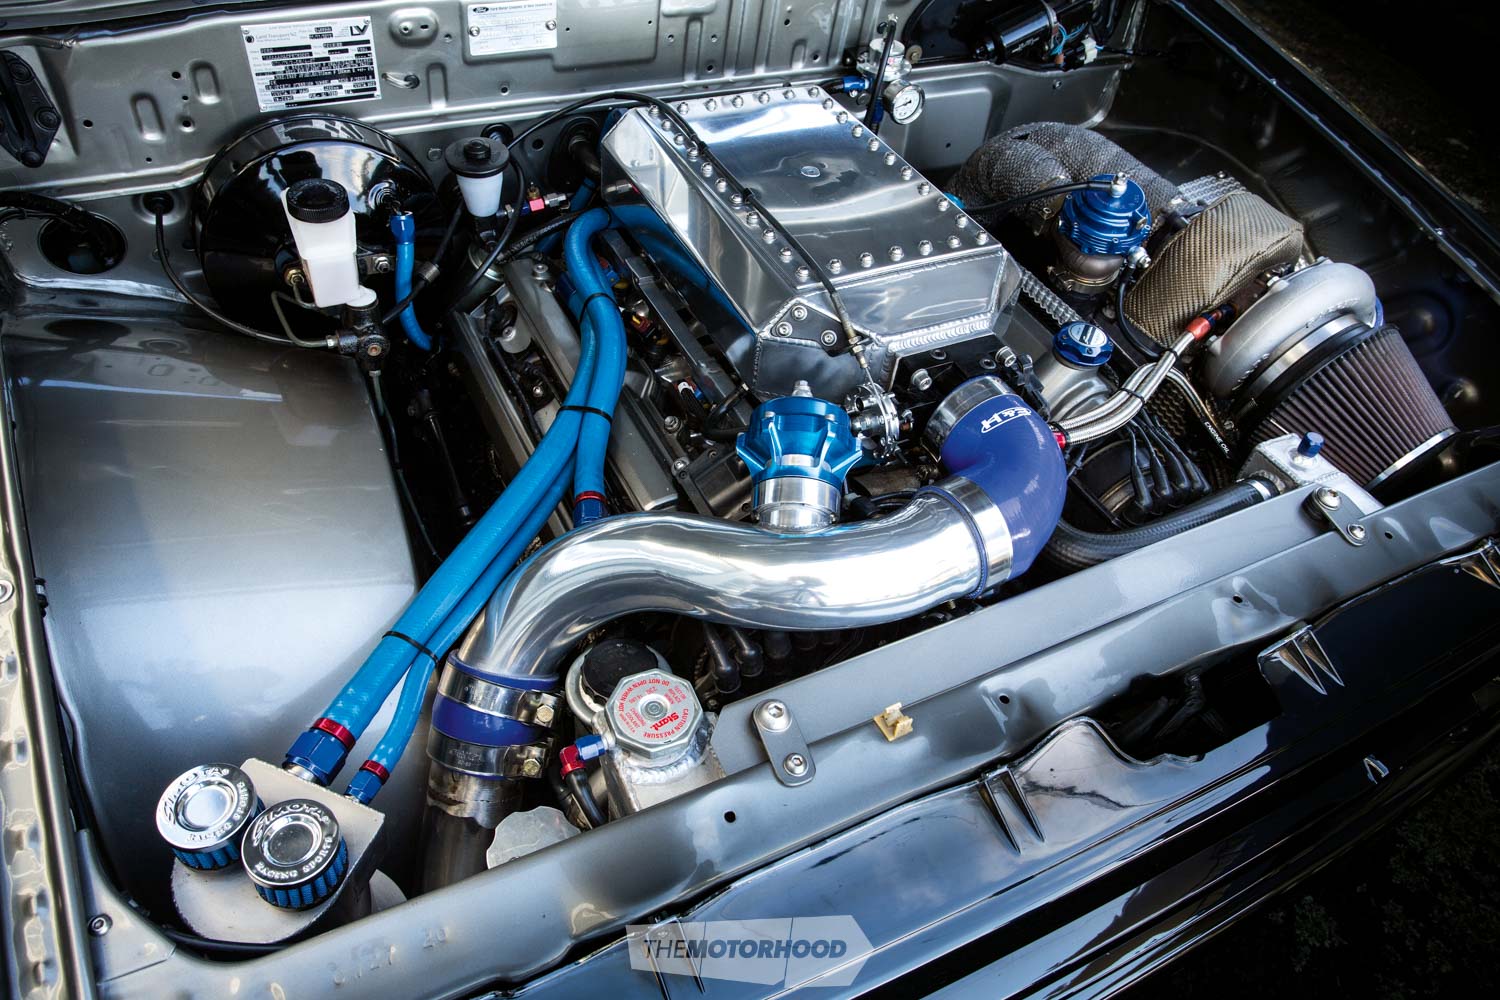
The Baseline
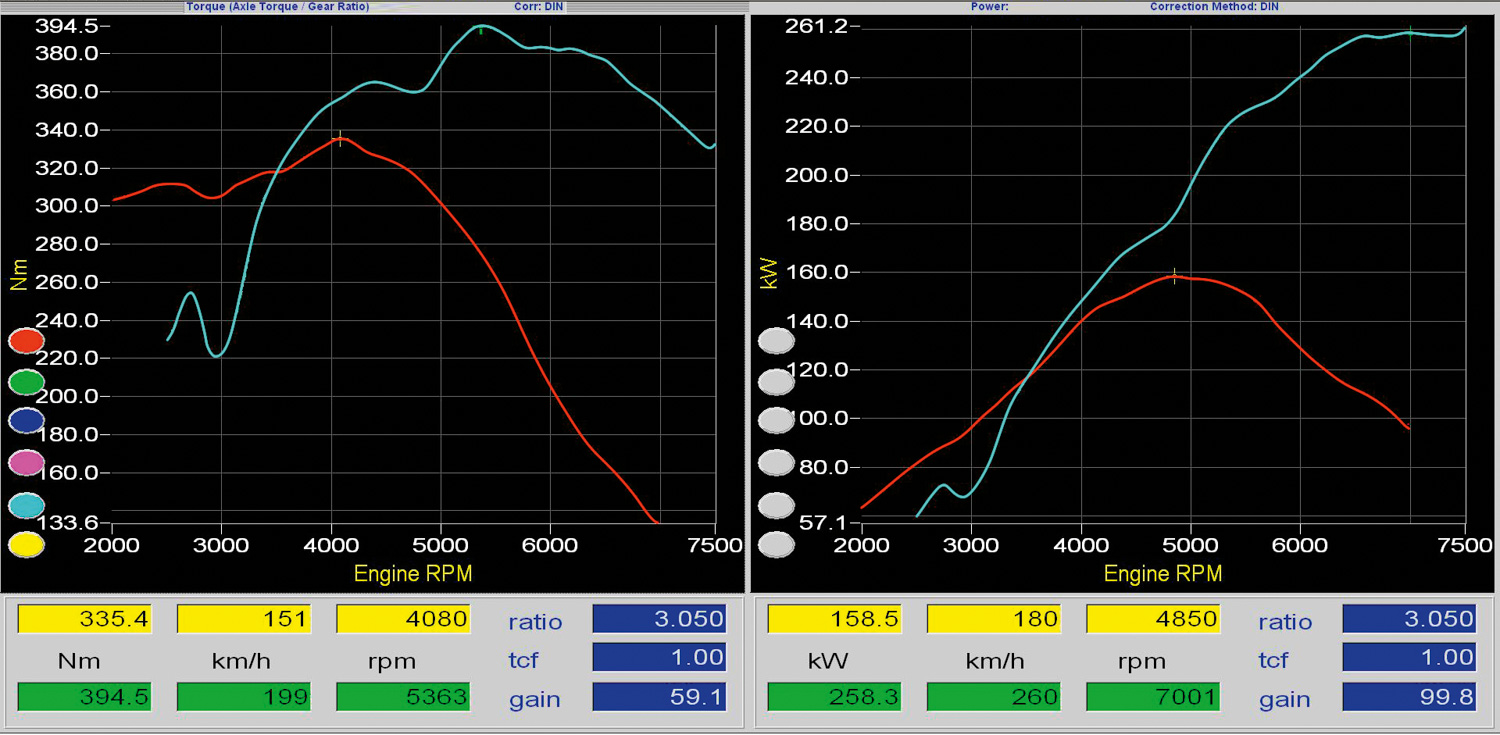
Depending on exactly which engine you are modifying, you can expect a power output of around 150–170 kilowatts (kW) at the wheels.
Improving Performance:
One of the biggest limitations with Toyota’s 1UZ-FE units is the stock engine management. Toyota is one of the few manufacturers for which we don’t have any easy means of reflashing or ‘chipping’ the stock ECU. The conservative factory tuning, coupled with a relatively restrictive airflow meter, limits power in stock form. Beyond this though, the stock log-style exhaust manifolds and the restrictive factory cylinder heads put a cap on power.
Given the popularity of these engines, there are almost no limits to what can be achieved, or which direction you can go when tuning them. We will look at three stages that should suit most budgets, and take us all the way to more than 400kW at the wheels.
Stage 1
For our stage-one upgrade, we’ll look at what I see as the most common direction people go with a 1UZ-FE engine swap. While it is possible to run these motors on the stock engine management, those aiming for decent power will want a little more tunability, and the combination of a wire-in engine management system such as the Link G4 Storm or Xtreme is the perfect match to a 1UZ-FE engine swap.
Once the rest of our modifications are complete, the Link G4 ECU will allow the tuning to be optimized to get the best power, torque, and economy out of the engine. The Storm only provides four ignition and injector outputs, hence it is a little limited when running an eight-cylinder engine. In particular, it can’t run true sequential fuel injection (where each injector is timed to operate when the intake valves are open). While this isn’t a problem on a stock or lightly modified engine, if you plan to go all out, you’ll benefit from the Xtreme ECU that has eight injector and ignition outputs.
While we will leave the engine internally standard, we’ll focus on freeing up both the intake and exhaust systems. The stock log-style exhaust manifolds are manufactured with budget in mind, not flow. Aftermarket headers are available for the 1UZ-FE, but with most of these motors being used for engine swaps, an off-the-shelf solution probably won’t suit. Talk to a fabricator or performance exhaust specialist about fabricating a set of four-into-one headers with 63-millimetre (mm) collectors. A twin 63mm exhaust, mating into a single 76mm system, will work well for most street performance applications. This will instantly release that appealing Toyota V8 rumble, too.
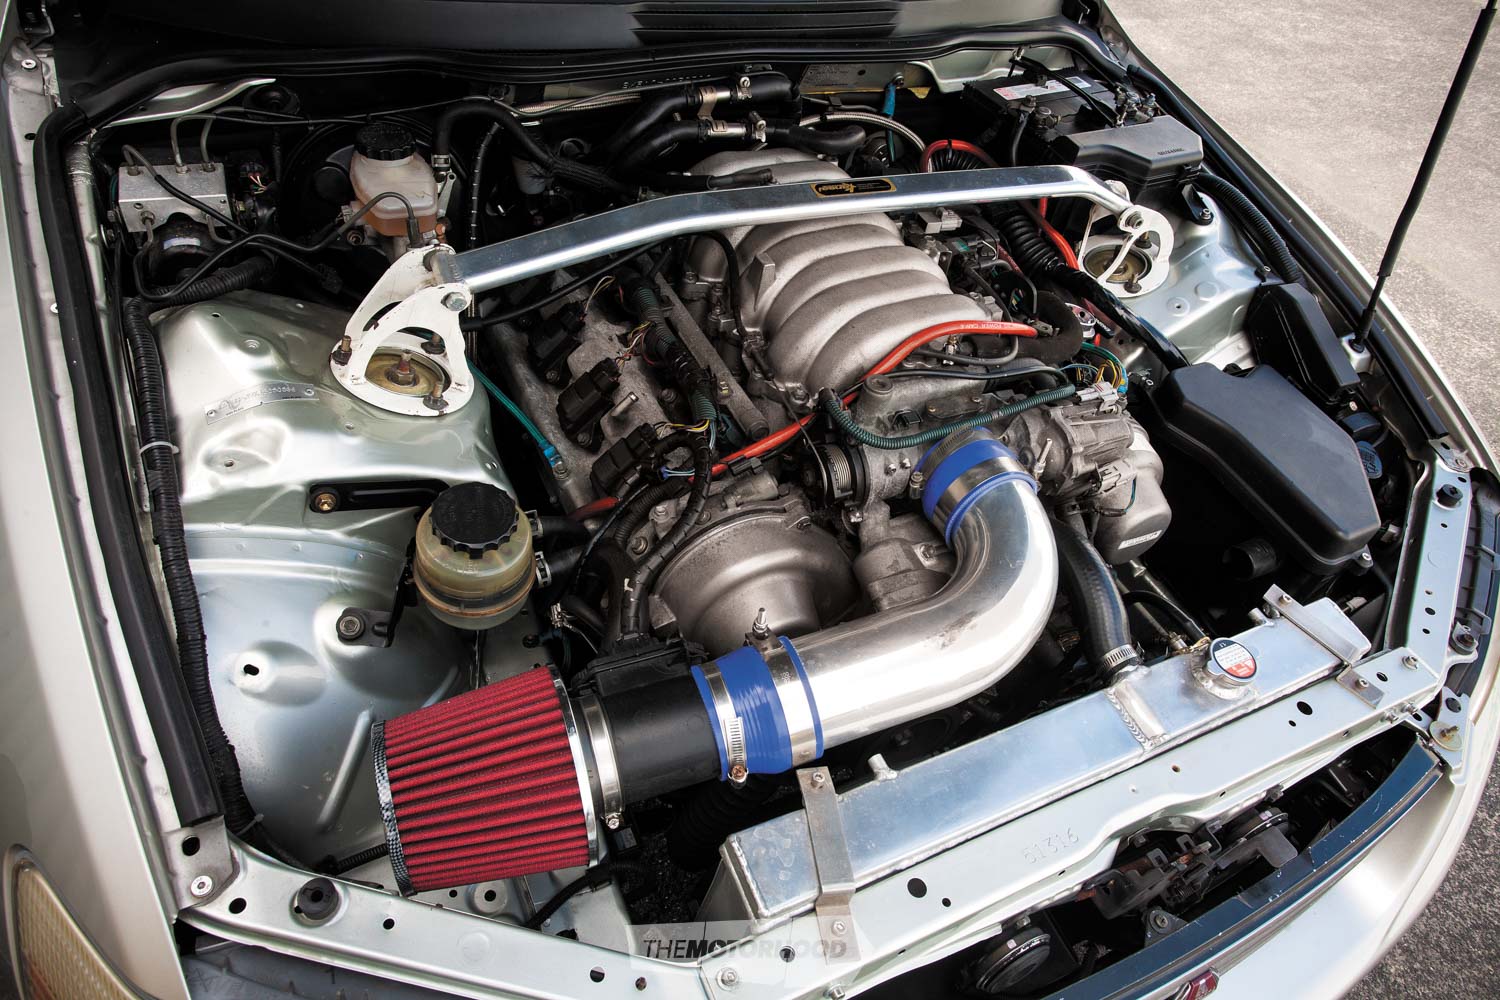
On the intake side, the choice of an aftermarket ECU means we won’t be stuck with the bulky and somewhat restrictive factory airflow meter and will be free to make up an intake to suit the application. What you decide to do will be influenced by the chassis the engine is in; however, a 76mm mandrel bent pipe running to a quality pod filter is good starting point. If you use a pod filter, try to locate it where it can get a supply of fresh cold air.
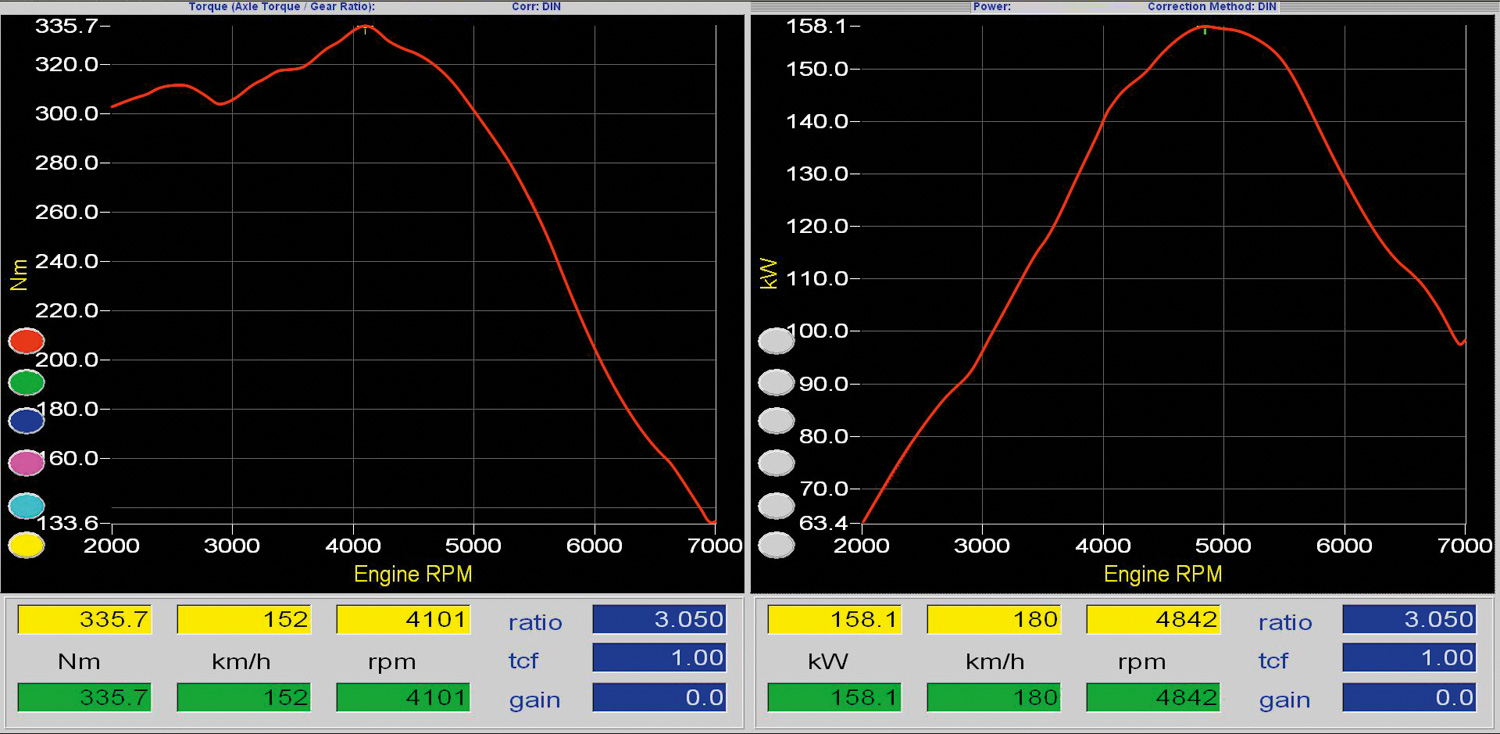
Once the hardware is fitted, it will be time to hit the dyno and dial in the tune to suit the new hardware. This should be a reasonably simple process, and you would expect to see between 170 and 190kW at the wheels. With the new headers and exhaust system though, the gains at high rpm will be really magnified when compared to stock.
Stage 2
The 1UZ-FE has become popular due to its inherent strength, but realizing this potential won’t happen without some more hard-core modifications. The factory heads are just too limited in terms of the amount of airflow they can provide, so we will look at what can be done to address this and achieve the true potential from the engine. While high-compression pistons and aftermarket rods are all options, we’ll keep the budget in check by just looking at a head and cam package.
The reason the factory cylinder head is restrictive is due to the packaging sacrifices Toyota had to make. For a quad-cam V8, the 1UZ-FE is actually very compact (check out a Nissan VH41 for comparison some time — they are huge!). This is because the heads use a scissor-drive arrangement where the exhaust camshaft is driven by a gear on the intake cam, rather than directly from the cambelt like most twin-cam heads. This allows the camshafts to be packaged much closer together, and so the heads are very narrow.
But the downside to this head design is the valve angle is also very narrow, which is not ideal from an airflow perspective. To make matters worse, the port shape is quite restrictive to airflow, too. Couple the poor head design with some conservative camshaft profiles, and the result is a serious limit on the amount of power we can expect to see.
The fix is to remove the heads and deliver them to one of the country’s recognized 1UZ-FE specialists — Kelford Cams and CSL Cams both spring to mind here. Either will be able to supply a package to suit your budget and use. This will include head porting, heavy-duty valve springs, multi-angle valve seats, and a more aggressive cam profile. Be realistic about your aims, because a wild head package may make great numbers on the dyno, but can be a real pain to live with in a street car.
These head packages will deliver a pair of heads that is ready to bolt on, but we will need to give some thought to head gaskets. The factory gaskets get the job done, but with their composite construction they aren’t ideal for high power levels. When the heads go back on, we will add a set of Cometic MLS gaskets for better sealing, and to ensure a good clamp we will add a set of ARP head studs.
Lastly we’ll free up the intake tract a little further with a set of individual throttle bodies. There are a variety of adaptor manifolds and linkage kits available now for the 1UZ-FE, and to keep it in the family we’ll use a set of eight 4AGE 20V throttle bodies.
On the dyno this combination will lose a little bottom-end power and torque, but from about 3000rpm up the new head package will show its value. With the improved flow, the torque will not drop so quickly at high rpm, and this will result in a massive increase in high-rpm power. Expect between 230–260kW at the wheels, depending on cam spec.
Stage 3
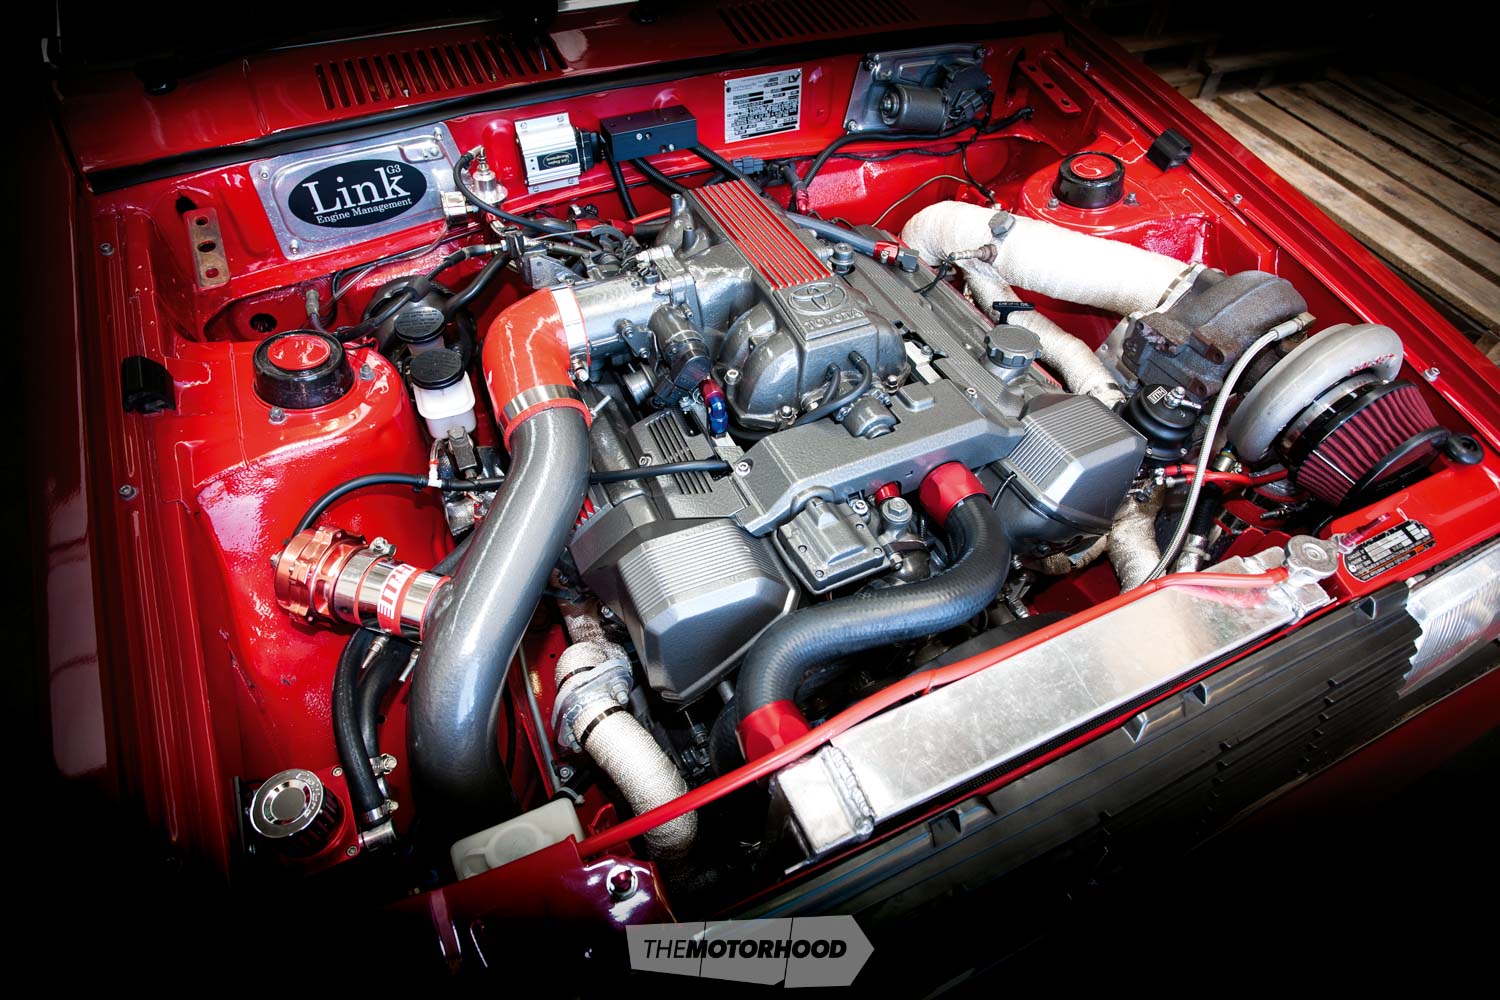
While we can still go further with a naturally aspirated engine, the cost versus gain becomes increasingly difficult to justify. Popular options from here include turbocharging and supercharging, and the 1UZ-FE has proven to take well to both options. For something a little different, we will look at the slightly more unusual option of adding nitrous.
While the 1UZ-FE is strong, it still isn’t bulletproof, and the two weaknesses are the cast pistons and the con rods. Properly tuned, a 1UZ-FE can live a long and healthy life with around 300–350kW at the wheels. If you plan to go further than this though, it will be time to build the bottom end.
The stock crankshaft is up to the task, but we will fit a set of forged pistons from JE and a set of con rods from Eagle. These parts will be more than adequate to handle our target of 400kW at the wheels. With a V8 engine, it is critical to make sure the entire rotating assembly is balanced to account for the weight of the new pistons and con rods.
To make power, an engine needs air and fuel, and getting the air into the engine is the hard part. Nitrous is basically chemical supercharging, where extra oxygen is injected into the engine. There are a variety of ways of doing this, but to get the best results, we will use a direct-port system where each intake runner is plumbed with a nitrous jet. We will need to add extra fuel to match the extra oxygen, and we will let the ECU handle this.
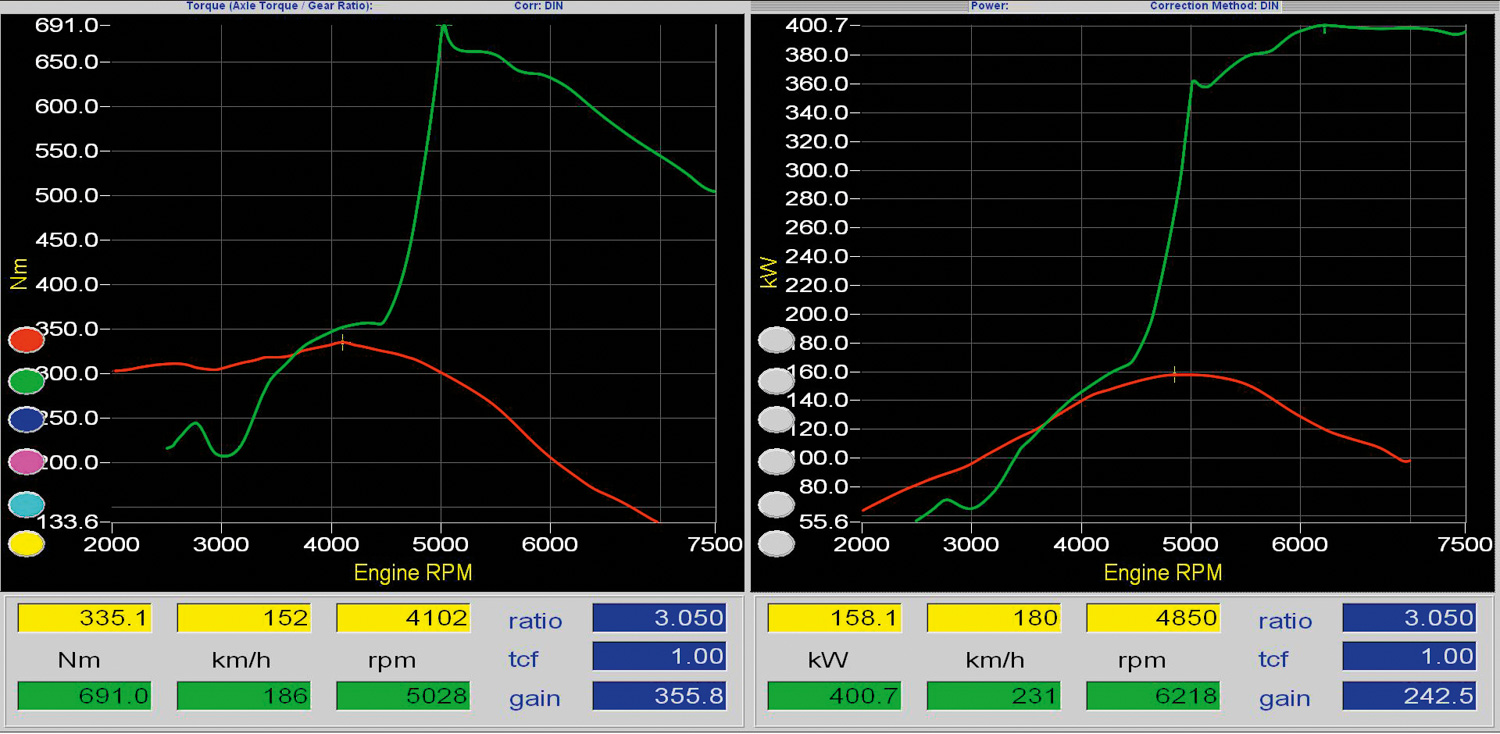
With a nitrous system we will be able to control the amount of nitrous (and hence the power) by changing the size of the jets in the nozzles. We will equip the nitrous kit with nozzles to provide a gain of around 150kW at the wheels. It is a fine balancing act with any nitrous system, as the power delivery is very aggressive. You instantly gain the 150kW of extra power as soon as the nitrous is triggered, so the nitrous kit needs to be tuned to suit the amount of traction available.
On the dyno we should expect to see around 400kW at the wheels. In this example we will use the ECU to control the nitrous to switch on at 4500rpm at wide-open throttle. Since our nitrous kit is a dry kit, we will also use the ECU to supply extra fuel when the nitrous is triggered. With this overlaid with the naturally aspirated engine, you will immediately see how sharply the power rises when the nitrous triggers. While nitrous isn’t for everyone, it is a cost-effective option when compared to turbocharging or supercharging.
Still not enough for you?
With its six-bolt bottom end, the 1UZ-FE is a great starting point for a serious build. If you plan to go stupid with the power levels, the alloy block can become a weakness with the sleeves in each cylinder moving or cracking. Ductile iron sleeves will solve this, and with more nitrous or a suitable turbo set-up, the sky is the limit.
This article originally appeared in NZ Performance Car issue No. 205 — to get your grubby hands on a print copy, click on the cover below