Modifying your car can be a daunting task, what with so many products available on the market, and conflicting views about which ones are effective. To help you out with some solid advice, we’ve roped in Andre SImon from STM to tell you exactly what works and what doesn’t. This month he advises us on how to build any Toyota JAZ80 Supra into the perfect all-rounder, and shows us the steps you’ll need to follow if you want to get the best bang for your performance dollar …
Tell us a little about the Toyota Supra …

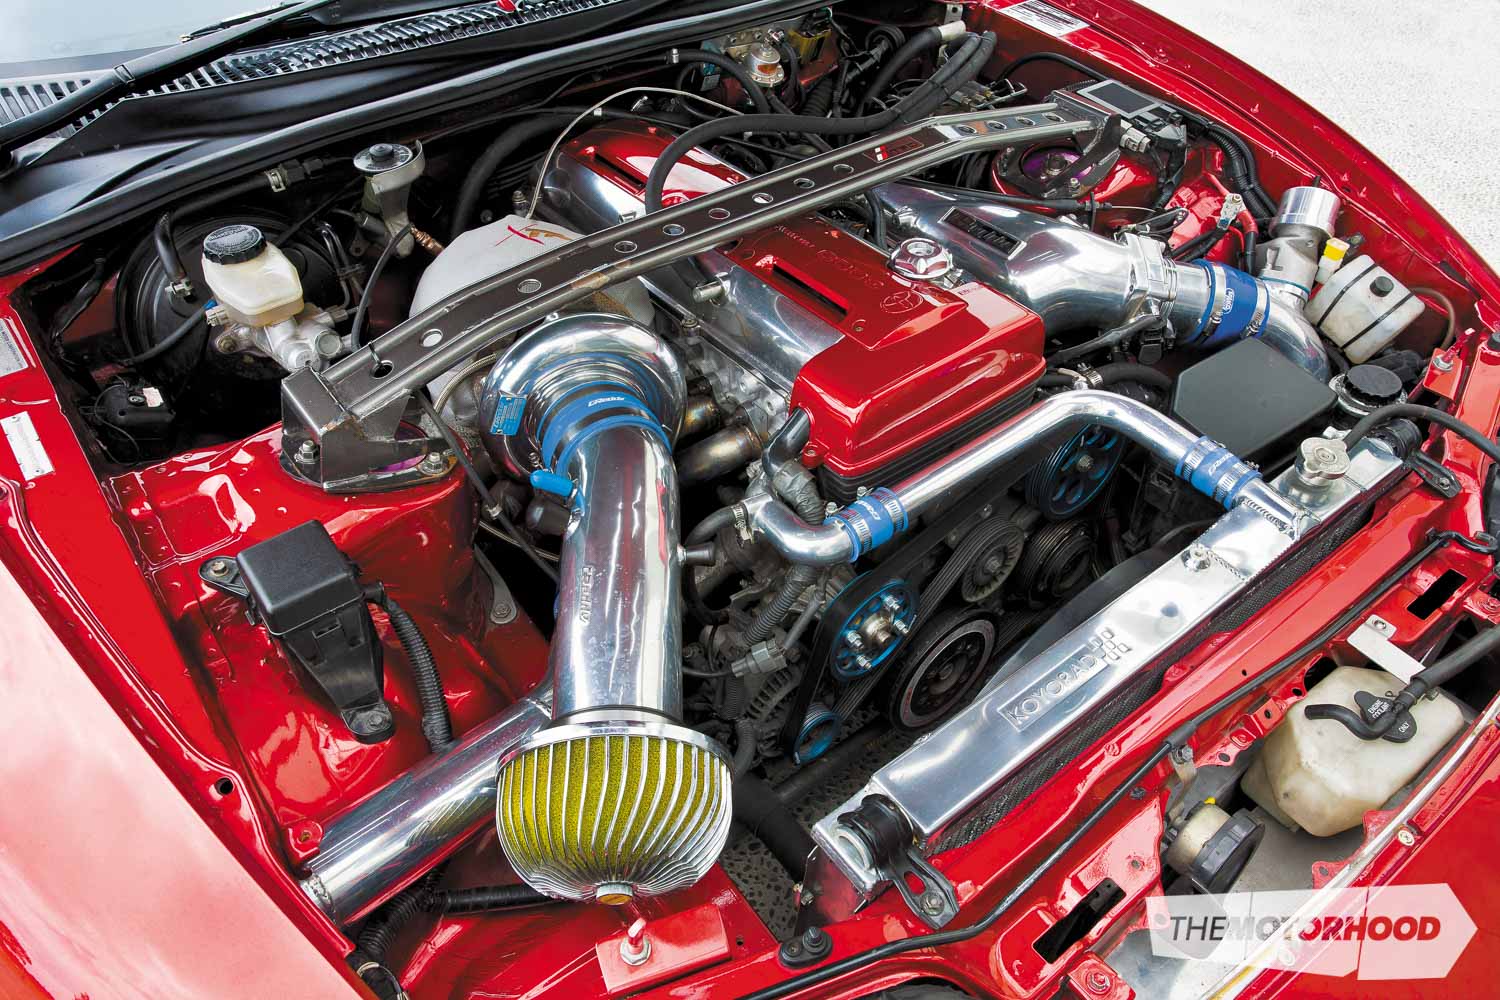
Toyota’s JZA80 Supra has achieved legendary status thanks mainly to its bulletproof 2JZ engine, and a drivetrain able to handle the abuse these engines can dish out. In the Japanese supercar realm, Toyota’s 2JZ is about the only engine of the same era that could stand its own ground when compared with the mighty RB26, and these two are fierce rivals. The 2JZ does have the advantage of an extra 400cc of capacity, which offers better boost response and a wider torque curve than the RB26.
In stock form, the 2JZ is limited by the sequential twin-turbo configuration and an ECU that isn’t easy to tweak or adjust. Fix these two areas, though, and the sky really is the limit, with the fastest and quickest sport compact cars on the planet relying on the mighty 2JZ for propulsion. While in serious drag applications, power levels of 1490kW are easily eclipsed, the 2JZ’s original claim to fame was its ability to support 745kW (1000whp) from a stock block. Not too many sport compact engines can make that claim!
Is there anything we should watch out for when picking a car?
While the JZA80 Supra is inherently strong, they are also getting on a bit now, so if you are in the market for one of these cars we suggest a thorough health check. Repairing a damaged 2JZ can be costly, so you want to know what you are buying. The 2JZ isn’t an overly complex engine, but it does pay to enlist the help of a workshop familiar with them.
The usual service items such as cambelt and water pump are one area to check, but a thorough check of engine health with a compression and leak-down test is also worthwhile. While the 2JZ is known to be bulletproof, often this means that tuners don’t think they need to worry about doing their job properly. Rest assured, a poor tune will still damage a 2JZ, it just might take a while.
Is there anything we should do before modifying a car?
As usual, a full service is always smart before you start modifying your car. Freshly imported cars from Japan often have a suspect service history, so a full service makes for cheap peace of mind. You also need to watch the cambelt and make sure these are changed at the recommended 100,000km intervals. A quick dyno run is always a good way to establish a baseline power figure prior to any modifications.
Sequential vs Parallel
Twin-turbo systems are nothing new, but there are two main ways of implementing the technology. The simpler and more conventional method is to use two equal-sized turbos, being supplied exhaust gas from three cylinders each. Both turbos run at the same time and this is called ‘parallel’. This is the technique used by Nissan’s RB26 GT-R engine.
The 2JZ employs ‘sequential’ turbocharging instead, where valving in the exhaust manifold is used to favour one turbo at low rpm, before switching to using both turbos at higher rpm. While the system is effective, it adds significant complexity, and is limited in its usefulness if you are considering swapping turbos.
The baseline
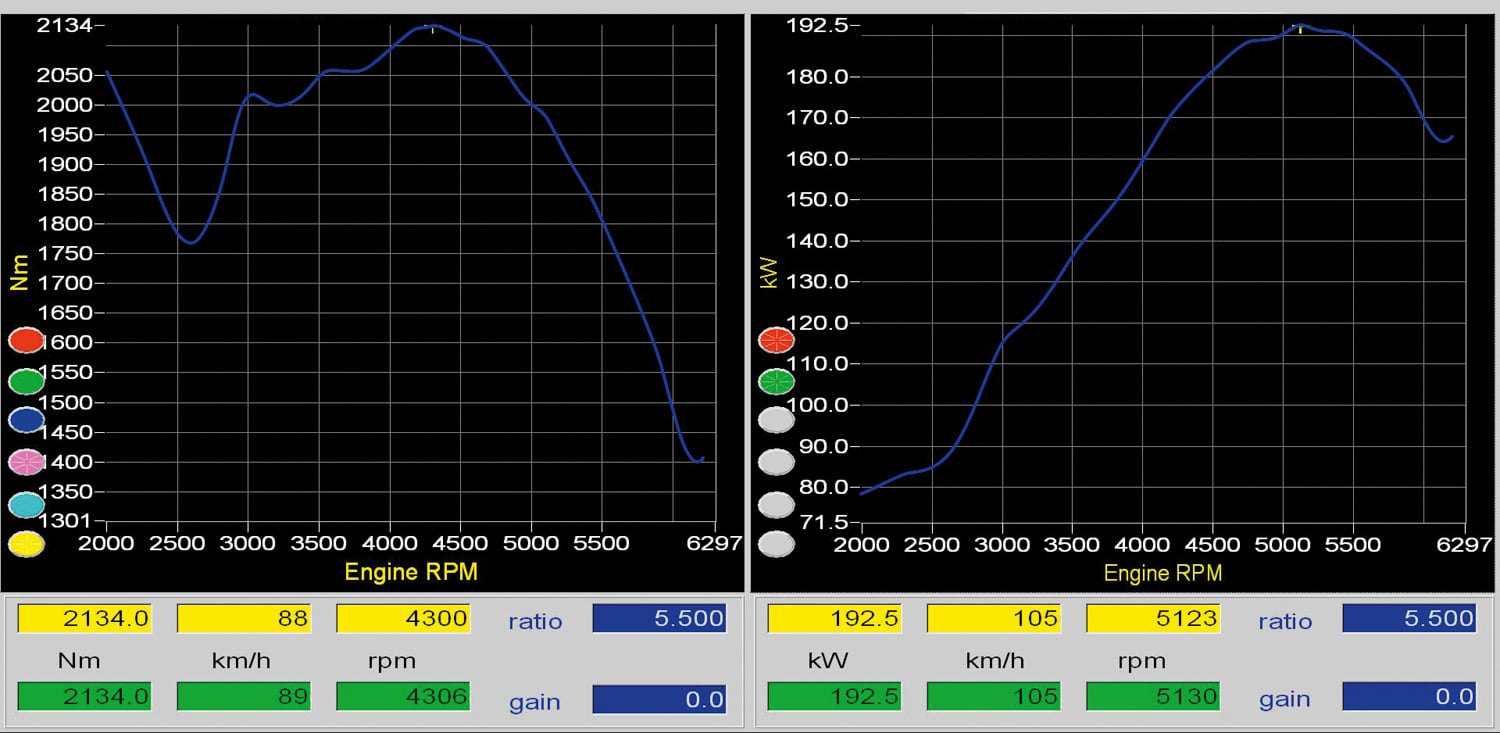
The Japanese-spec JZA80 Supra was rated at 206kW in line with Japanese legal requirements. This translates to around 170–190kW at the rear wheels from what we have seen, although it can be hard to find a standard one these days! Stock boost pressure sits around the 10–12psi mark.
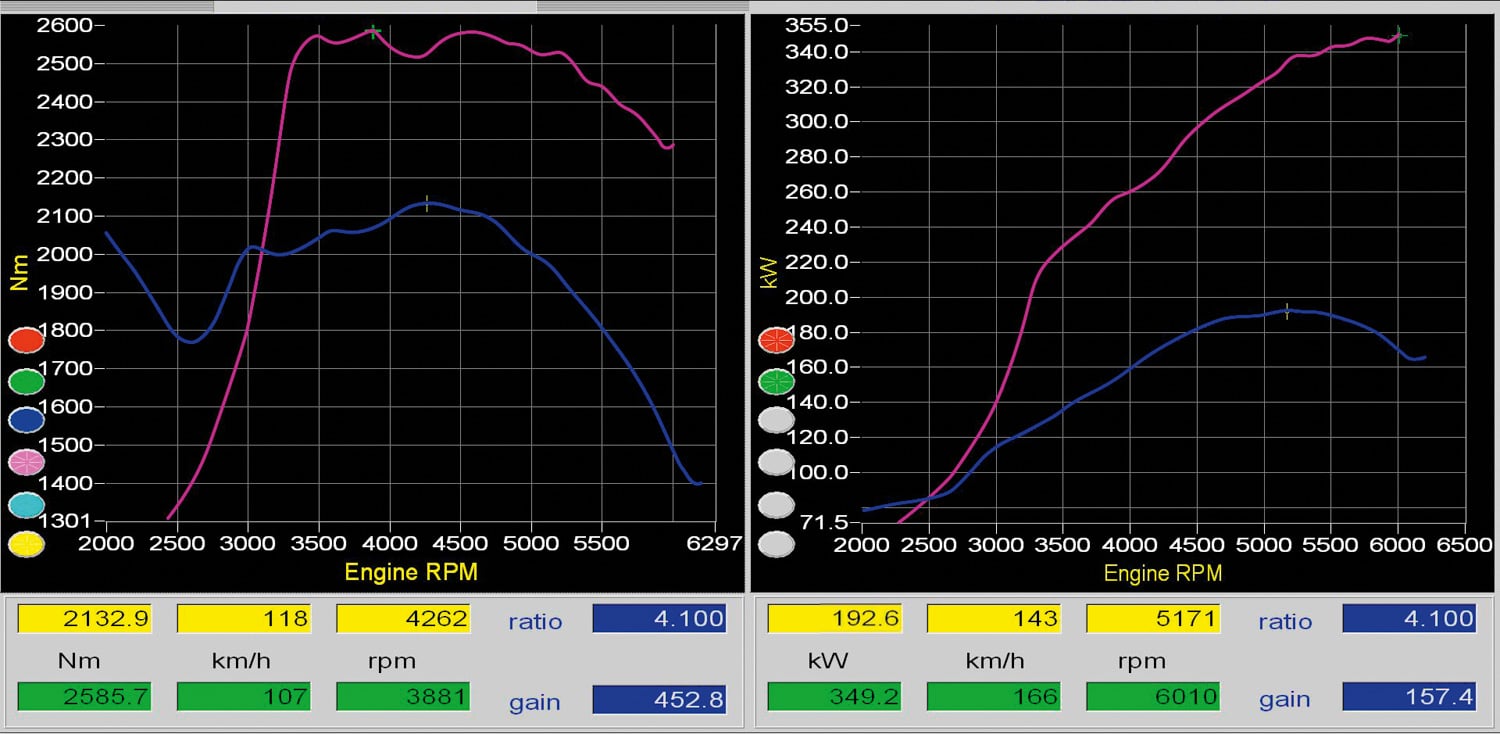
Improving Performance
Since the 2JZ engine has so much potential, it is a dream to modify and the results can be spectacular. With such a strong engine from the factory, we can go pretty wild with the bolt-on parts and, provided the tuning is safe, we will end up with a powerful and reliable package. We will look at three stages of upgrade that will take us all the way to 500-plus kilowatts at the wheels, while concentrating on getting a wide torque curve.
Stage one

Improving the performance of the 2JZ in our stage-one upgrade will focus on simply optimizing what the factory supplied. Since we generally only see the JDM-model JZA80 here in New Zealand, we are stuck with the smaller ceramic turbos as well as the small 440cc injectors. With so many people upgrading these cars, getting hold of the steel-wheel US domestic market (USDM)–spec turbos as well as the 550cc USDM-spec injectors shouldn’t present too much trouble or expense.
Before we fit the turbos, we will also spend some time porting the factory wastegates. This will help us avoid the boost creep issues that can become a problem once you bolt a higher-flowing exhaust to these engines. Speaking of exhausts, we will need to free up the exhaust flow by fitting a 3.5-inch system. On the intake side, we will fit a new 600x300x76mm front-mounted intercooler.
Tuning is the key to getting great results from the 2JZ, but unfortunately Toyota didn’t make life easy for us here. Unlike many popular models, the Supra does not have an ECU that supports reflashing. This means there is very little we can do with the stock ECU to match our new bolt-ons. While further down the line our upgrades will require a stand-alone ECU, here we can get by with a piggyback ECU to make the changes we need.
A ‘piggyback ECU’ leaves the factory ECU in control for most of the time, and only makes changes where necessary. The theory is simple, but unfortunately there are also a lot of bad products out there that give poor results. A couple of my favourites for the 2JZ include Haltech’s old Interceptor, and the new Link G4+ Storm or Xtreme, which can be used in a piggyback installation. One bonus with using a piggyback is you can still retain control over the factory automatic transmission, which isn’t so easy when we move to a stand-alone ECU.
The results at this stage will be near-stock boost response, with more power and torque almost everywhere. We can expect a power output of around 300kW at the wheels on around 18psi. This is a great upgrade if you want to retain a stealth look in the engine bay, as it would take a keen eye to see anything has changed.
Stage two
With our next round of upgrades, we will aim for a moderate package of around 350–400kW at the wheels, with great boost response. Bearing in mind the 2JZ’s well-known strength, this stage of upgrades still shouldn’t put too much stress on the engine when tuned properly. At this point, the main areas limiting our power production are the sequential twin turbos and the fuel system. We will leave the entire engine in 100-per-cent stock trim and focus on these limitations instead.
There is just about an unlimited number of options out there to achieve this sort of power goal, and a lot will come down to personal preference. One of my favourites is the tried and proven Garrett GT3582R single turbo on a high-mount exhaust manifold. The poor little GT35 almost looks lost in the giant Supra engine bay, but it is well sized to satisfy our power aims without introducing excessive lag. On the street, this combo almost feels like a stock set-up until you put your foot down. Sure, more power is as easy as a larger turbo, but with that comes increased lag.
To match the new turbo, we will need to increase the fuel supply to cope. At this point, a set of 1000-cubic-centimetre injectors from Injector Dynamics will be more than enough for our needs. Controlling this package is a little beyond a basic piggyback ECU, and since we have now ditched the twin turbos, our options are a lot wider. While we can fit just about any stand-alone ECU, for ease of installation we will use the new Link G4 plug-In ECU.
Hitting the dyno to calibrate the Link G4 ECU should quickly show the potential of the new turbo. We can expect to lose a small amount of low rpm response, but the GT3582 will really shine anywhere from 3000rpm and above. The GT3582 will easily support 300-plus kilowatts at the wheels with a mild 14–16psi, but if you want to wind the boost up to around 20–22psi, we should be able to easily see 350-plus kilowatts at the wheels.
Stage three
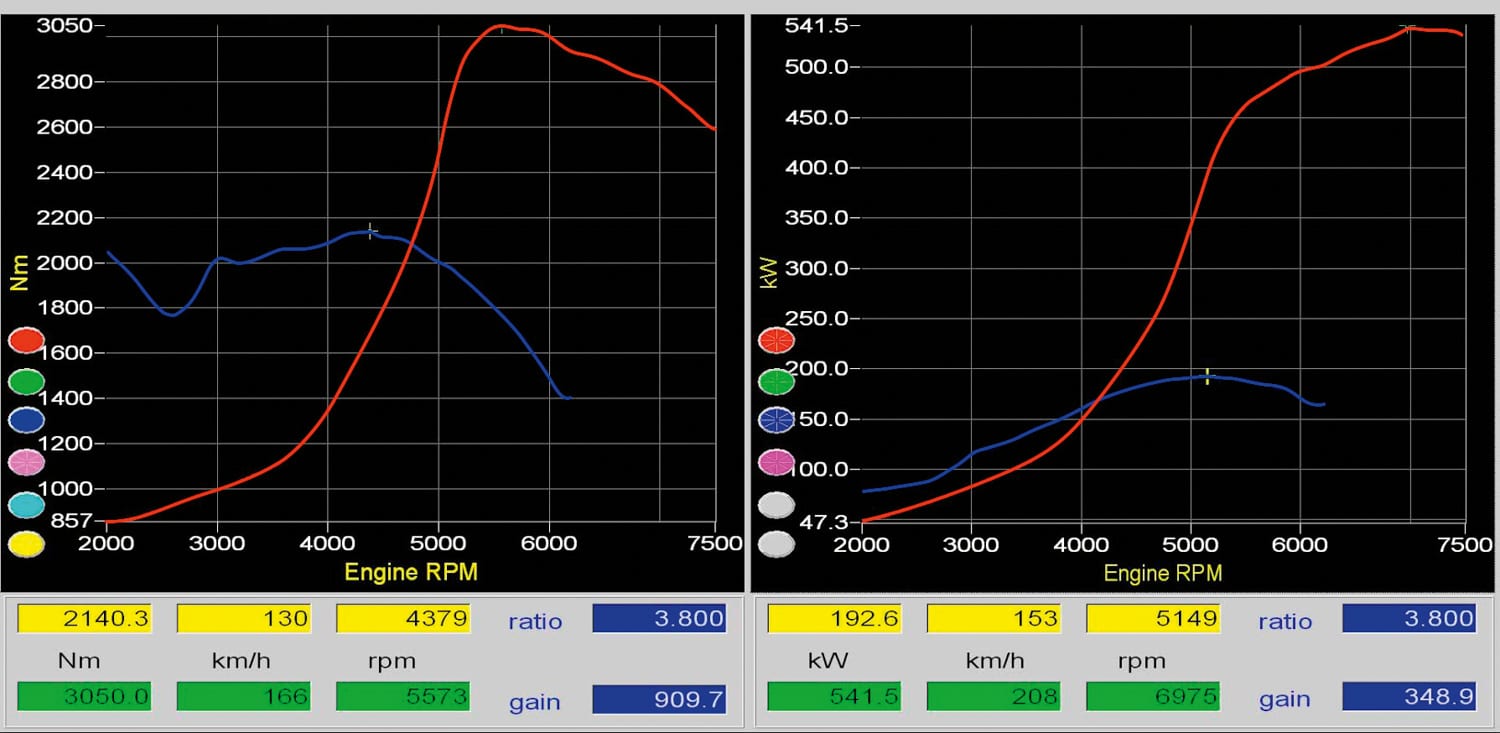
With the stage-three upgrade package, we will see what 2JZ performance is all about and aim for a power output of around 550kW at the wheels. Now, I’ll admit this isn’t exactly a stretch for a 2JZ, but we aren’t building a dedicated drag car and are looking for something that still retains a worthwhile power band. While there are numerous examples of 2JZs getting around with these sorts of numbers on a stock engine, we want to be here for a long time, not just a good time, so will build a stronger engine to cope with the added power.
The 2JZ bottom end is incredibly tough in stock form, but Toyota did elect to use a cast piston design. Cast pistons are not tolerant of detonation, and their reliability decreases exponentially as you turn up the boost. We will swap the stockers for a set of forged JE pistons for reliability with extreme cylinder pressure. While we are at it, we will fit a set of Eagle H-Beam con rods to match the new slugs, and replace the big end and main bearings with ACL’s Race Series bearings for reliability. Finally, a set of ARP studs will hold the bottom end together.
The head is the key to airflow, although with a relatively modest aim of ‘only’ 550kW at the wheels, we still don’t need to go wild here. A moderate set of cams from Kelford will do the trick quite nicely. We will fit its 272/278-degree racing cams, which offer a massive improvement in top-end power without destroying the idle quality or low-rpm performance. These will need to be matched to a set of vernier cam gears to allow the cam timing to be dialled in perfectly, and we will also need to fit a set of Kelford’s beehive valve springs to handle the more aggressive cams. The head will be clamped back to the block with an HKS head gasket and ARP L19 head studs.
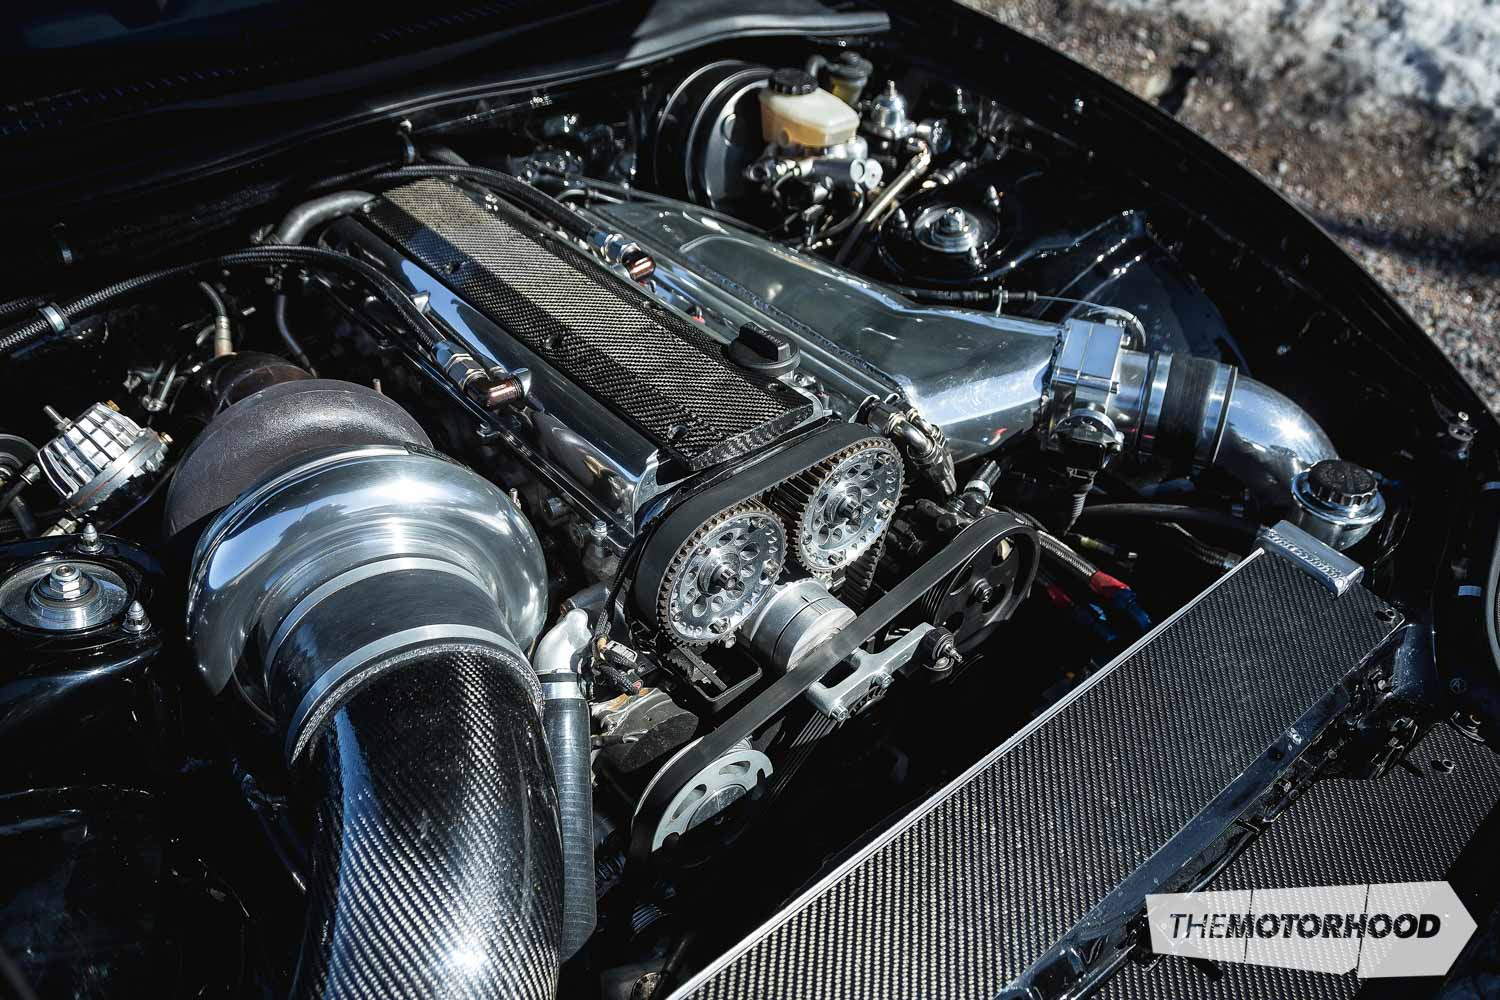
Getting air into the engine will be next on our list, and to make our target, we’ll fit a Garrett GT4202 turbo on a Full-Race Motorsports stainless exhaust manifold. This manifold uses a split pulse design to improve response, and twin external wastegates for superior boost control. Moving forward, we will fit a massive 600x300x150 intercooler to get rid of the intake charge temp before heading into a Hypertune plenum.
Fuel delivery will be handled by a set of Moran 2400cc injectors, which are designed specifically for alcohol fuel. That’s handy, since this engine will be drinking a steady diet of E85 fuel. To control the whole package, we can still rely on the Link G4 Plug-In ECU. Heading to the dyno, we should see a power output of around 550kW at the wheels with a modest 24psi.
Still not enough for you?

The 2JZ is famous for insane power levels, and the only limit is your sanity (and the size of your bank balance). At the pointy end, power levels of 1000-plus kilowatts are possible and well proven, although not entirely suitable for heading down to the corner shop. If you want to get this serious, there are a few more aspects to consider.
The stock main bearing caps can prove to be a weakness at these power levels, so you will need to invest in a set of billet main caps. The flow limitations of the 2JZ cylinder head will also start to show up as you raise the power, so a set of oversize valves will be essential, as will a thorough porting. Lastly, you will have your work cut out for you holding the head to the block. Oversize ARP L19 head studs will be a start, but you should get familiar with replacing head gaskets because you will be doing it frequently.
This article was published in NZ Performance Car Issue No. 206. You can buy a print copy or a digital copy of the edition below: